|
| Spring fling! 10% off all patterns and eBooks! |
|
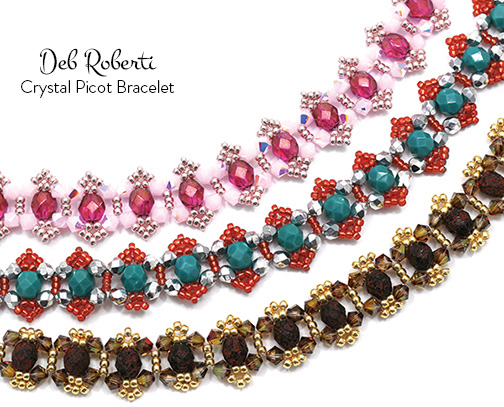
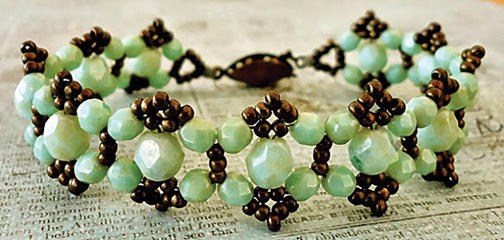
CRYSTAL PICOT BRACELET (©2008 Deborah Roberti)
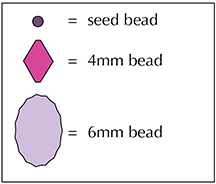
Use size 11 seed beads and any type size 4mm and 6mm beads to create this pretty crystal bracelet that works up fast. MATERIALS (for a 7-inch bracelet, not including clasp)
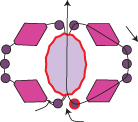
Step 1: Thread your needle with 3 yards of Nymo, C-Lon or Fireline. String a seed bead, a 6mm bead, a seed bead, a 4mm bead, three seed beads and a 4mm bead. Leaving about a 10-inch tail for attaching the clasp, tie the beads together in a circle with a double knot:
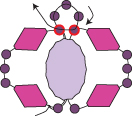
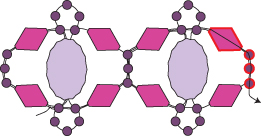
Step 2: Go back up through the seed bead and the 6mm bead that you added in the last step (highlighted in RED):
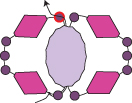
Step 3: String a seed bead, a 4mm bead, three seed beads, a 4mm bead and a seed bead. Go around and back up through the 6mm bead that you exited at the end of the last step (highlighted in RED):
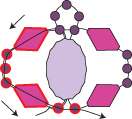
Step 4: Go through the top-left seed bead highlighted in RED:
Step 5: String three seed beads. Go around and back across through the top two seed beads (both highlighted in RED), forming a picot:
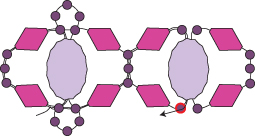
Step 6: Go back down and around through the 4mm bead, the three seed beads, the 4mm bead and the bottom two seed beads highlighted in RED:
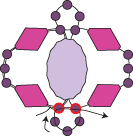
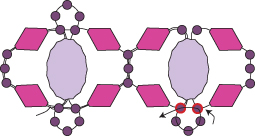
Step 7: String three seed beads. Go around and back across through the bottom two seed beads (both highlighted in RED), forming another picot:
Step 8: Go back up through the 4mm bead and the three seed beads highlighted in RED:
OPTIONAL: Linda Genaw has a wonderful tweak to create pointy picots (see the photo below) instead of round ones as I do. You can find downloadable PDF instructions at her blog here:
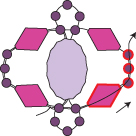
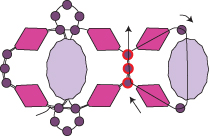
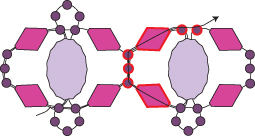
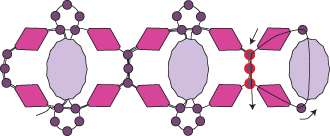
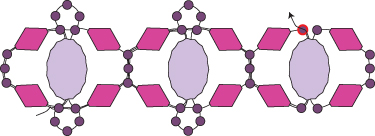
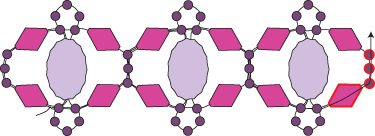
Step 9: String a 4mm bead, a seed bead, a 6mm bead, a seed bead and a 4mm bead. Go around and back up through the three seed beads that you exited at the end of the last step (highlighted in RED):
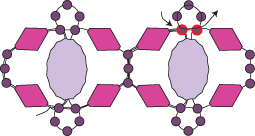
Step 10: Go back around through the 4mm bead, the seed bead and the 6mm bead that you added in the last step (highlighted in RED):
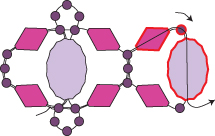
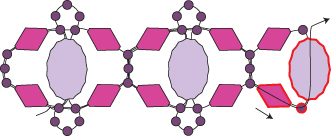
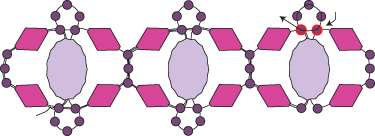
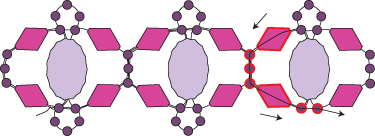
Step 11: String a seed bead, a 4mm bead, three seed beads, a 4mm bead and a seed bead. Go around and back down through the 6mm bead that you exited at the end of the last step (highlighted in RED):
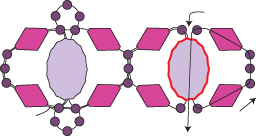
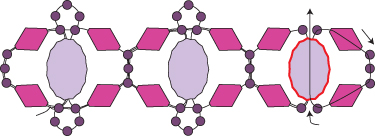
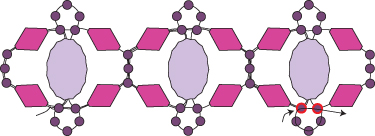
Step 12: Go through the bottom-left seed bead highlighted in RED:
Step 13: String three seed beads. Go around and back across through the bottom two seed beads (both highlighted in RED), forming another picot:
Step 14: Go back up and around through the 4mm bead, the three seed beads, the 4mm bead and the top two seed beads highlighted in RED:
Step 15: String three seed beads. Go around and back across through the top two seed beads (both highlighted in RED), forming another picot:
Step 16: Go back down through the 4mm bead and the three seed beads highlighted in RED:
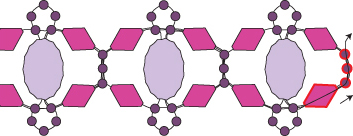
Step 17: String a 4mm bead, a seed bead, a 6mm bead, a seed bead and a 4mm bead. Go around and back down through the three seed beads that you exited at the end of the last step (highlighted in RED):
Step 18: Go back around through the 4mm bead, the seed bead and the 6mm bead that you added in the last step (highlighted in RED):
Step 19: String a seed bead, a 4mm bead, three seed beads, a 4mm bead and a seed bead. Go around and back up through the 6mm bead that you exited at the end of the last step (highlighted in RED):
Step 20: Go through the top-left seed bead highlighted in RED:
Step 21: String three seed beads. Go around and back across through the top two seed beads (both highlighted in RED), forming another picot:
Step 22: Go back down and around through the 4mm bead, the three seed beads, the 4mm bead and bottom two seed beads highlighted in RED:
Step 23: String three seed beads. Go around and back across through the bottom two seed beads (both highlighted in RED), forming another picot:
Step 24: Go back up through the 4mm bead and the three seed beads highlighted in RED:
Repeat Steps 9 to 24 until your bracelet is the length you want it, minus about a half-inch and the length of your clasp:
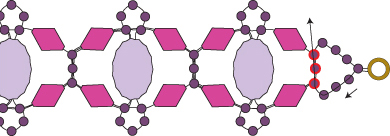
Step 25: To attach one end of the clasp, string four seed beads. Go through the clasp and then back through the last seed bead that you just strung:
Step 26: String three more seed beads. Go back up through the three seed beads that you exited at the end of Step 24 (highlighted in RED):
Go back around through these seed beads and the clasp several times to reinforce your attachment to the clasp. Weave your way back into the bracelet, knot in several places and then cut your thread. Step 27: To attach your clasp to the other end of the bracelet, thread your needle with the tail thread from Step 1. Go up through the 4mm bead and the three seed beads highlighted in RED:
Repeat Steps 25-26 to attach your clasp. |