|


|
HANA-AMI BRACELETS (©2004 Deborah Roberti)
In Japanese beadwork, triangle weave is used to create a motif called Hana-Ami (Hana means “flower” and Ami means “stitch” or “net”). Although I use fire-polished beads, any type of size 4mm bead will work beautifully.
Creating the Hana-Ami Motif
MATERIALS (for a 7-inch bracelet, not including clasp)
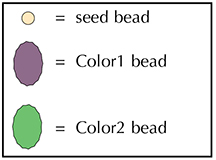
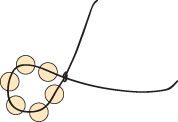
Step 1: Thread your needle with 2 yards of thread or Fireline. String 6 seed beads. Bring the seed beads to the middle of your length of thread and tie them in a circle with a double knot:
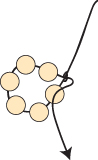
You’ll be starting in the middle of the bracelet, using half the thread to create the center motif and the right side of the bracelet, and the other half of the thread (the long tail) to create the left side. Step 2: Go through the seed bead below the knot:
Step 3: String a Color2 bead, a seed bead, a Color1 bead, a seed bead and a Color2 bead. Go around and back through the seed bead (on the circle of six seed beads) that you exited at the end of the last step (highlighted in RED):
Step 4: Go through the next seed bead on the circle of six seed beads:
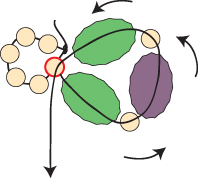
String a Color2 bead, a seed bead, a Color1 bead and a seed bead. Go around and back through the Color2 bead you added in the last step and the seed bead that you just exited (both beads highlighted in RED):
Step 5: Go through the next seed bead on the circle of six seed beads. String a Color2 bead, a seed bead, a Color1 bead and a seed bead. Go around and back through the Color2 bead that you added in the last step and the seed bead that you just exited (both beads highlighted in RED):
Step 6: Go through the next seed bead on the circle of six seed beads. String a Color2 bead, a seed bead, a Color1 bead and a seed bead. Go around and back through the Color2 bead that you added in the last step and the seed bead that you just exited (both beads highlighted in RED):
Step 7: Go through the next seed bead on the circle of six seed beads. String a Color2 bead, a seed bead, a Color1 bead and a seed bead. Go around and back through the Color2 bead that you added in the last step and the seed bead that you just exited (both beads highlighted in RED):
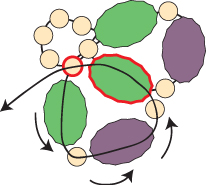
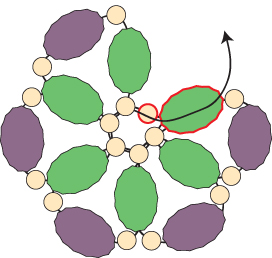
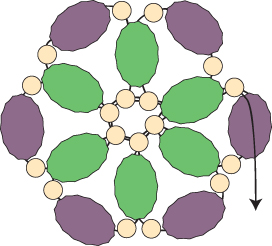
Step 8: In this step, you will close up the motif. Go through the next seed bead on the circle of six seed beads and the Color2 bead that you strung in Step 3 (highlighted in RED):
String a seed bead, a Color1 bead and a seed bead. Go around and down through the Color2 bead that you added in Step 7, through the two seed beads on the circle of six seed beads, and around through the Color2 bead, the seed bead and the Color1 bead highlighted in RED:
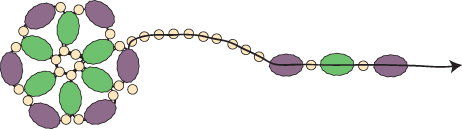
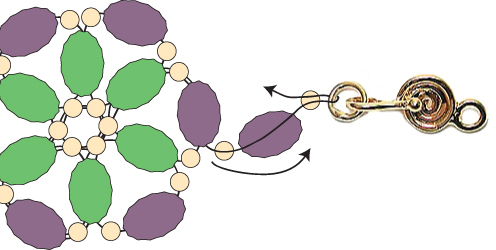
Step 9: To create one side of the bracelet, string 10 seed beads, a Color1 bead, a seed bead, a Color2 bead, a seed bead and a Color1 bead:
Step 10: String 10 more seeds beads, a Color1 bead, a seed bead, a Color2 bead, a seed bead and a Color1 bead:
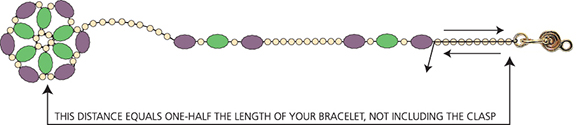
Step 11: String 10 or more seed beads—the number of seed beads you string will determine the overall length of your bracelet. I’m afraid that to get the length you want, you’ll have to do a bit of measuring and some math right about here. Go through one end of your clasp, and then back through the seed beads you just strung:
Step 12: Continue back through the Color1 bead, the seed bead, the Color2 bead, the seed bead, the Color1 bead, the 10 seed beads, the Color1 bead, the seed bead, the Color2 bead, the seed bead and the Color1 bead:
String 10 seed beads and go up through the Color1 bead on your motif (highlighted in RED):
Step 13: Go through all beads you added in Steps 9-12 and the clasp twice to reinforce the bracelet:
Weave inside of the bracelet, knot and cut the thread. Step 14: Thread your needle with the other half of the thread (the long tail from Step 1) and weave your way out of the Color1 bead on the opposite side of the motif. Repeat steps 9 to 13 to complete the left side of the bracelet:
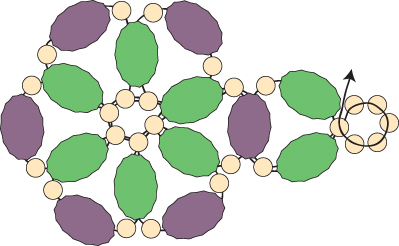
Combining Motifs
MATERIALS (for a 7-inch bracelet, not including clasp)
Step 1: To begin, thread your needle with 4 yards thread or Fireline, and then complete Steps 1-8 of Creating the Hana-Ami Motif:
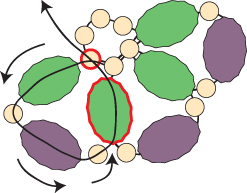
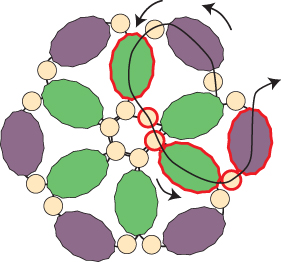
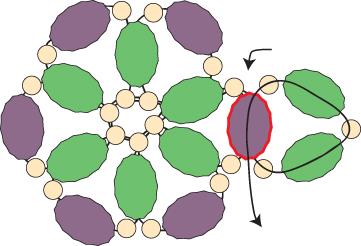
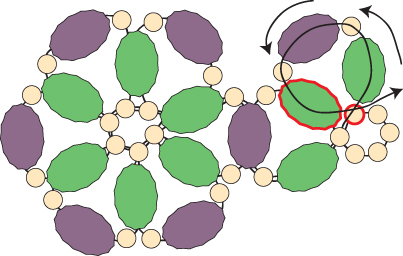
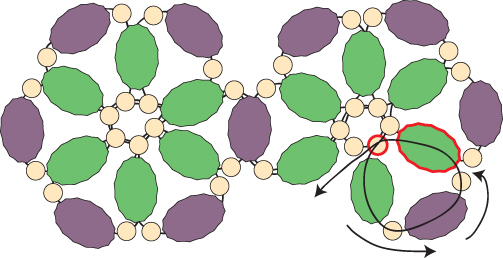
Step 2: String a seed bead, a Color2 bead, a seed bead, another Color2 bead and a seed bead. Go around down through the Color1 bead highlighted in RED:
Go back around through the beads highlighted in RED:
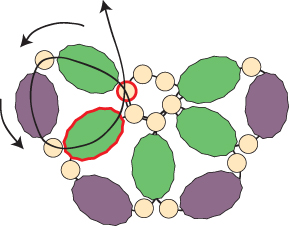
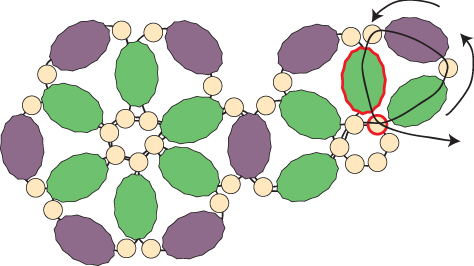
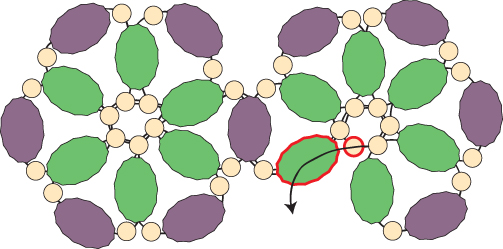
Step 3: Go back through the seed bead, the Color2 bead and the seed bead highlighted in RED:
Step 4: String 5 seed beads. Go around and up through the seed bead that you exited at the end of the last step, creating a new circle of six seed beads:
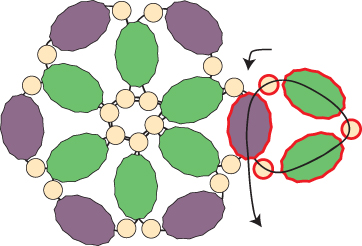
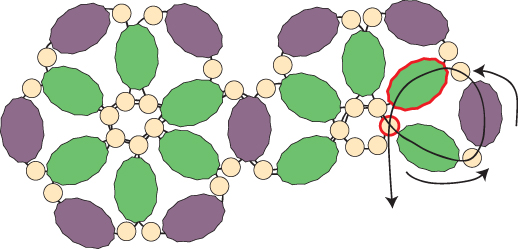
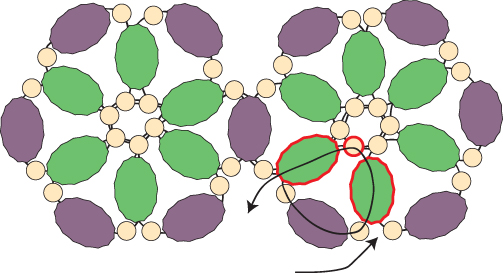
Step 5: Go through the next seed bead on the new circle of six seed beads. String a Color2 bead, a seed bead, a Color1 bead and a seed bead. Go around and back through the Color2 bead that you added in Step 2 and the seed bead that you just exited (both highlighted in RED):
Step 6: Go through the next seed bead on the new circle of six seed beads. String a Color2 bead, a seed bead, a Color1 bead and a seed bead. Go around and back down through the Color2 bead that you added in the last step and the seed bead that you just exited (both beads highlighted in RED):
Step 7: Go through the next seed bead on the new circle of 6 seed beads. String a Color2 bead, a seed bead, a Color1 bead and a seed bead. Go around and back through the Color2 bead that you added in the last step and the seed bead that you just exited (both beads highlighted in RED):
Step 8: Go through the next seed bead on the new circle of 6 seed beads. String a Color2 bead, a seed bead, a Color1 bead and a seed bead. Go around and back through the Color2 bead that you added in the last step and the seed bead that you just exited (both beads highlighted in RED):
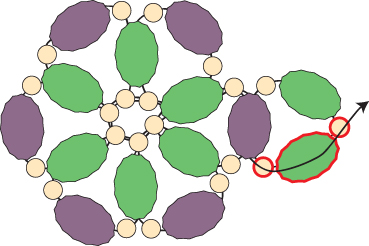
Step 9: Go through the next seed bead on the circle and out through the Color2 bead highlighted in RED:
String a seed bead, Color1 bead and a seed bead. Go up through the Color2 bead, through the seed bead on the circle of six seed beads and out through the Color2 bead that you just exited (all beads highlighted in RED):
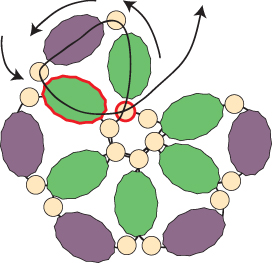
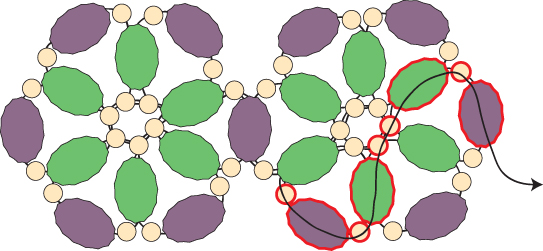
Weave your way back around so that you are exiting from the right-most Color1 bead (the best path highlighted below in RED):
Step 10: Repeat Step 2 to Step 9 until you have about a foot of thread left. Step 11: To attach the clasp, string a seed bead, a Color1 bead and a seed bead. Go through the clasp and then back through the last seed bead that you just strung:
String a Color1 bead and a seed bead. Go back down through the Color1 bead on the motif (highlighted in RED):
Go around through these beads and the clasp several times. Weave your way inside the bracelet, knot and cut the thread. You have finished the right side of the bracelet. Step 12: Now you’ll finish the left side of the bracelet. To begin, thread your needle with the other half of the thread (the long thread tail from Step 1). Weave your way out of the Color1 bead on the opposite side of the motif like in the illustration below. It makes it easier if you flip the work around so you are working left to right:
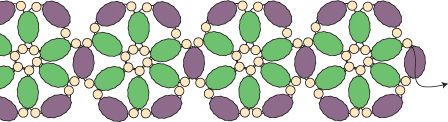
Step 13: Repeat Steps 2-9 until your bracelet the length you want it. I used a total of 9 motifs to create a 7-inch bracelet, including the clasp. If your clasp is larger, you may want to create only 8 motifs. Repeat Step 11 to attach the other end of the clasp.
|