 |
|
CRYSTAL WINDOWS EARRINGS (©2018 Deborah Roberti)
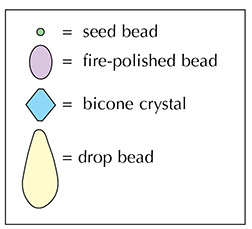
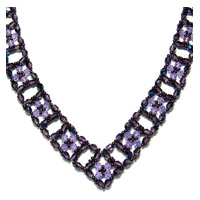
A very simple and easy crystal erring pattern that matches my Crystal Windows Bracelet, Crystal Windows Cuff and Crystal Windows Necklace. MATERIALS
Step 1: Thread your needle with about a yard of FireLine or One-G. String a fire-polished bead, a seed bead, a bicone crystal, a seed bead, a bicone crystal, a seed bead, a fire-polished bead and a seed bead. Leaving about a six-inch tail that you can weave in and cut at any time, tie the beads in a circle with a double knot:
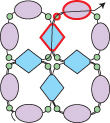
Step 2: Go back around through the seed bead, the fire-polished bead, the seed bead, the bicone crystal, the seed bead and the bicone crystal that you just strung (highlighted in RED):
Step 3: String a seed bead, a fire-polished bead, a seed bead, a fire-polished bead, a seed bead, a bicone crystal and a seed bead. Go around and back down through the bicone crystal that you exited at the end of the
Step 4: Go back around through the seed bead, the fire-polished bead, the seed bead, the fire-polished bead, the seed bead and the bicone crystal that you added in the last step (highlighted in RED):
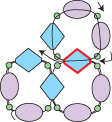
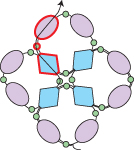
Step 5: String a seed bead, a bicone crystal, a seed bead, a fire-polished bead, a seed bead, a fire-polished bead and a seed bead. Go around and back across through the bicone crystal that you exited at the end of the last step (highlighted in RED):
Step 6: Go back up through the seed bead and the bicone crystal that you added in the last step (highlighted in RED):
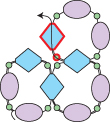
Step 7: String a seed bead, a fire-polished bead, a seed bead, a fire-polished bead Go around and across through the bicone crystal highlighted in RED:
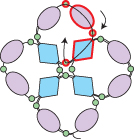
Step 8: String a seed bead. Go up through the bicone crystal and the seed bead, and then across through the fire-polished bead (all beads highlighted in RED):
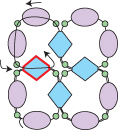
Step 9: Flip the motif about 45 degrees counterclockwise:
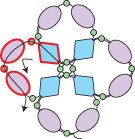
Step 10: Go back around through the beads in RED:
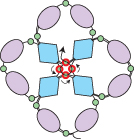
Step 11: Circle back around through the four seed beads in the center (highlighted in RED):
Step 12: Go back around through the beads highlighted in RED:
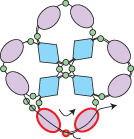
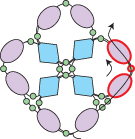
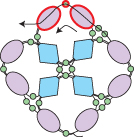
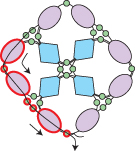
Step 13: String two seed beads. Go back around through the beads highlighted in RED so that the two new seed beads fill the gap between the two fire-polished beads:
Step 14: String two seed beads. Go back up through the beads highlighted in RED so that the two new seed beads fill the gap between the two fire-polished beads:
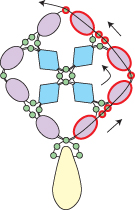
Step 15: String two seed beads. Go back around through the beads highlighted in RED so that the two new seed beads fill the gap between the two fire-polished beads:
Step 16: String two seed beads. Go back around through the beads highlighted in RED so that the two new seed beads fill the gap between the two fire-polished beads:
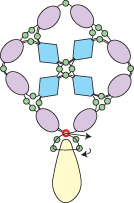
Step 17: String two seed beads, a drop bead and a two more seed beads. Go back around through the seed bead that you exited at the end of the last step )highlighted in RED:
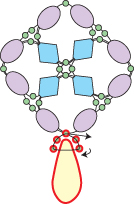
NOTE: Depending on the amount of space between the drill hole and the top of the drop bead, you may have to adjust the number of seed beads. Step 18: Circle back around through the beads that you just added (highlighted in RED):
Step 19: Go back around through the beads highlighted in RED:
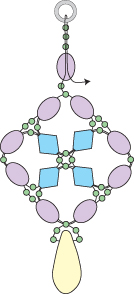
Step 20: To add the jump ring, string a seed bead, a fire-polished bead and three seed beads.
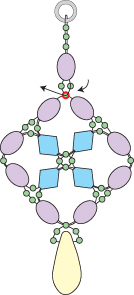
Step 21: String a seed bead. Go back across through the seed bead highlighted in RED:
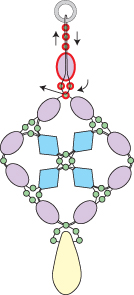
Step 22: Go back around through the beads highlighted in RED and jump ring for reinforcement:
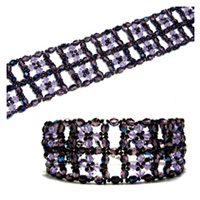
Weave back into the earring, knot and cut your thread. Attach your earring to your finding. For more color combinations, click on the photo below to visit the RedPandaBeads.com Gallery of Color Suggestions!
|
