|


|
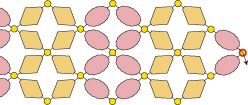
ROSALINE GOLD BRACELET (©2005, updated 2024 Deborah Roberti)
This easy right-angle weave bracelet is ideal for beading beginners. Looks stunning and works up in about an hour. I use a combination of fire-polished and bicone crystal beads but you can easily use other types of 4mm beads like round glass pearls and druks. Materials (for a 6.75-inch bracelet, not including clasp):
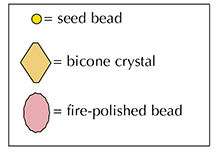
Step 1: Thread your needle with a length of FireLine that you feel comfortable working with and add more as you need it. String a fire-polished bead, a seed bead, a bicone crystal, a seed bead, a bicone crystal, a seed bead, a fire-polished bead and a seed bead. Leaving about an 8-inch tail for attaching one end of the clasp, tie the beads in a circle with a double knot:
Step 2: Go back around through the beads that you just added:
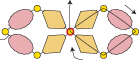
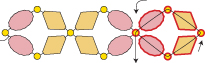
Step 3: Go back through the fire-polished bead, the seed bead, the bicone crystal and the seed bead highlighted in RED:
Step 4: String a bicone crystal, a seed bead, a fire-polished bead, a seed bead, a fire-polished bead, a seed bead and a bicone crystal. Go around and back up through the seed bead that you exited at the end of the last step (highlighted in RED):
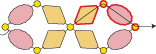
Step 5: Go back around through the beads that you just added (highlighted in RED): Step 6: Go back around through the bicone crystal, the seed bead, the fire-polished bead
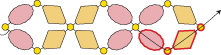
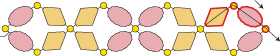
Step 7: String a fire-polished bead, a seed bead,
a bicone crystal, a seed bead, a bicone crystal, Go around and down through the seed bead that you exited at the end of the last step (highlighted in RED):
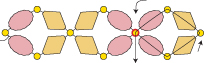
Step 8: Go back around through the beads that you just added (highlighted in RED):
Step 9: Go back around through the fire-polished bead, the seed bead, the bicone crystal and the seed bead that you added in the last step (highlighted in RED):
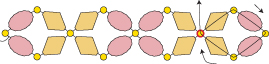
Step 10: String a bicone crystal, a seed bead, a fire-polished bead, a seed bead, a fire-polished bead, a seed bead and a bicone crystal. Go around and back up through the seed bead that you exited at the end of the last step (highlighted in RED):
Step 11: Go back around through the beads that you just added (highlighted in RED):
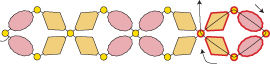
Step 12: Go back around through the bicone crystal, the seed bead, the fire-polished bead
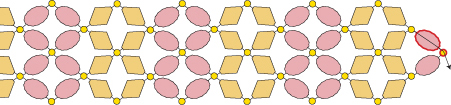
Step 13: Repeat Steps 7 to 12 until your bracelet is the length you want it, minus about a quarter-inch and the length of your clasp:
Step 14: Go back down through the fire-polished bead and the seed bead at the end of the bracelet (highlighted in RED):
Step 15: String a bicone crystal, a seed bead and a bicone crystal. Go through the next seed bead along the bottom of the bracelet (highlighted in RED):
Step 16: String a fire-polished bead, a seed bead and a fire-polished bead. Go through the next seed bead along the bottom of the bracelet (highlighted in RED):
Step 17: String a bicone crystal, a seed bead and a bicone crystal. Go through the next seed bead along the bottom of the bracelet (highlighted in RED):
Step 18: Repeat Steps 16 and 17 until you get to the end of the bracelet:
Step 19: Go back around through the fire-polished bead, the seed bead, the fire-polished bead and the seed bead at the end of the bracelet (highlighted in RED):
Step 20: Repeat Steps 15 to 18 to add sets of bicone crystals, fire-polished beads and seed beads across the top of the bracelet:
Step 21: Go down through the fire-polished bead and the seed bead highlighted in RED:
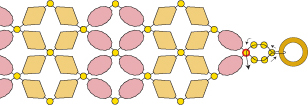
Step 22: To attach the clasp, string three seed beads, go through your clasp and back through the last seed bead that you just strung. String two more seed beads and go back down through the seed bead that you exited at the end of the last step (highlighted in RED):
NOTE: To make your bracelet longer, just add more beads (or larger beads) than directed in Step 23: Go through these seed beads (highlighted in RED) and the clasp several times to reinforce it:
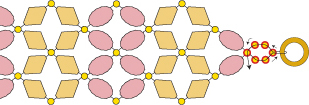
Use you extra tail thread to weave back along the bracelet edge beads to give your bracelet some extra strength. Knot in several places and cut your thread. Step 24: To attach the clasp to the other end of your bracelet, thread your needle with the tail thread from Step 1. Go down through the seed highlighted in RED:
Repeat Step 22 and 23.
Beads used in the photo above
Gold and Pink Version:
For more color and bead combinations, click on the photo below to visit the RedPandaBeads.com Gallery of Color Suggestions!
|