|
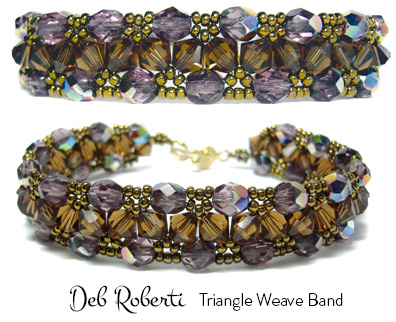
TRIANGLE WEAVE BAND
(©2011 Deborah Roberti)

Materials (for a 7-inch bracelet, not including clasp)
• 4 yards of 6 lb. or 8 lb. FireLine
• About 175 size 11 seed beads
• About 28 size 6mm bicone crystals
• About 27 size 6mm
fire-polished beads (Note: Most any size 6mm beads should work just as well as fire-polished beads)
• clasp

Step 1: Thread your needle with a length of FireLine that you feel comfortable working with and add more as you need it.
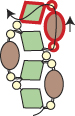
String a seed bead, a fire-polished bead, a seed bead, a bicone crystal, a seed bead and a bicone crystal. Leaving about a 10-inch tail for attaching one end of the clasp, tie the beads in a triangle with a double knot:

Step 2: Go back around through the seed bead, the fire-polished bead, the seed bead and the bicone crystal that you added in the last step:

Step 3: String a seed bead, a fire-polished bead, a seed bead, a bicone crystal and a seed bead.
Go around and back down through the bicone crystal that you exited at the end of the last step (highlighted in RED):

Step 4: Continue back around through the seed bead, the fire-polished bead, the seed bead and the bicone crystal that you added in the last step (highlighted in RED):

Step 5: String a seed bead, a fire-polished bead, a seed bead, a bicone crystal and a seed bead.
Go around and back down through the bicone crystal that you exited at the end of the last step (highlighted in RED):

Step 6: Continue back around through the seed bead, the fire-polished bead, the seed bead and the bicone crystal that you added in the last step (highlighted in RED):
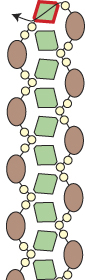
Step 7: Repeat Step 3 to Step 6 until your bracelet is the length you want it, minus about a half-inch and the length of your clasp:

Step 8: At the end of your bracelet, go back down through the seed beads and fire-polished beads highlighted in RED:

Step 9: At the other end of your bracelet, go back up through the seed beads and fire-polished beads highlighted in RED:

Step 10: Go through the top bicone crystal highlighted in RED:
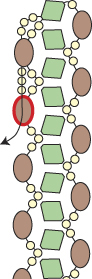
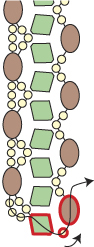
Now you’ll add three seed beads in between each fire-polished bead on the left side. Unfortunately, not all size 11 seed beads are the same size so if adding three seed beads doesn’t fill the gap between the two fire-polished beads, add four seed beads instead.
Step 11: String three (or four) seed beads. Go down through the fire-polished bead highlighted in RED:

Step 12: String three (or four) seed beads. Go down through the fire-polished bead highlighted in RED:
Step 13: Repeat Step 12 until you get to the end:

Step 14: String three (or four) seed beads. Go back around through the bicone crystal, the seed bead and the fire-polished bead highlighted in RED:
Now you’ll add three seed beads in between each fire-polished bead on the right side. Again, if adding three seed beads doesn’t fill the gap between the two fire-polished beads, add four seed beads instead.
Step 15: String three (or four) seed beads. Go up through the fire-polished bead highlighted in RED:
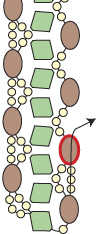
Step 16: Repeat Step 15 until you get to the end:

Step 17: Go through the top seed bead highlighted in RED:
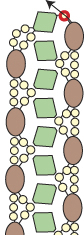
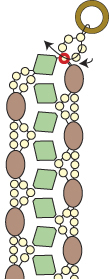
Step 18: To attach one end of the clasp, string three seed beads.
Go through your clasp and then back through the last seed bead that you just strung:
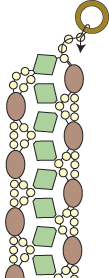
NOTE: To make your bracelet longer, just add more beads (or larger beads) than directed in this step and the next.
Step 19: String two seed beads.
Go across through the seed bead highlighted in RED:
Step 20: Go back around through the seed beads highlighted in RED and the clasp several times:
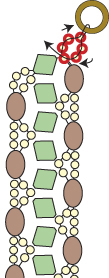
Knot in several places and then cut your thread.
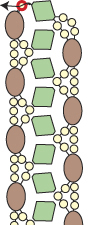
Step 21: To attach the clasp to the other side of the bracelet, thread your needle with the tail from Step 1.
Go through the seed bead highlighted in RED:
Repeat Step 18 to Step 21.

|